Showing posts with label Recipes. Show all posts

Wednesday, September 17, 2014

New Taste Treat–Grilled Pizza

Earlier this summer I saw a chef grilling pizza on the BBQ.  I made a mental note that when I eventually purchased a BBQ I wanted to give that a try.

So I give you, grilled pizza!  Easy, delicious and quick to whip up.  Give it a try!

First, I purchased prepared dough from the grocery store.  I’ve made my own in the Kitchen Aid a few times but this time it was all about simplicity.  As I fought with the dough to get it to a size larger than a quarter (How do they do that?  Will need to take lessons from my friend’s son who is working at a local pizza shop!) I also cooked or heated most of the pizza toppings.

Once everything was ready to go it was time to start grilling!

I put the dough directly on the grill and let the bottom get crusty.  So neat to watch it bubble and expand!IMG_4739

When the one side was grilled I brought it into the house and flipped it onto a cookie sheet with the grilled side up.  The whole thing had pizza sauce and (cooked) bacon on it.  I added mushrooms to my side making sure not even one jumped to Hannah’s side and to her side we added pineapple. (This was also a great thing to make together!) I love cooking and baking with my girl!

Cheese was then sprinkled on the entire pizza.  I need to be cautious with Hannah’s cheese intake so hers tends to have less and mine more but I did that when she wasn’t looking. Winking smileIMG_4741

Once the pizza was topped it was back to the grill for a second time.  IMG_4742

I would like to show you a pic of us digging in but it was so delicious that I forgot to take any pics.  You’ll just have to trust us that it was delicious!!

If you’re looking for a tasty new way to makeover your pizza, try baking them on the BBQ!

Friday, January 13, 2012

Christmas Yummies

Over the Christmas season there are a few things that I make each year and they’re my ‘go to’ appetizers.  I often make them in bulk and then freeze them, taking out what we need when we’re going to an open house or Christmas party with family or friends.

I have two all-time favourites and want to share them with you. 

Ranch Stars

I think over the Christmas season I made about 20 dozen of these and took them to lots of places.  (And I didn’t remember to take a single picture!)  Each time they were gobbled up and I took home an empty plate which truly is the goal of any food I take to a potluck….no leftovers.  Smile 

Here’s the recipe:

2 cups tri-cheese shredded mix (I use Tex-Mex blend)

1/2 lb. ground pork

1/2 lb. ground turkey

1/2 green pepper

1/2 red pepper

1 small bottle ranch dressing

1 small can black olives

2 packages won ton wrappers (1 package normally has 2 stacks of wrappers)

Use mini muffin tin to create stars to hold filling.  Place wonton wrapper in mini muffin tin and press into place.

Bake at 375o for 5 mins.

Prepare filling:

- fry ground pork and ground turkey and drain well

- finely chop peppers and olives

- mix all ingredients in a large bowl. 

- fill each wonton with mixture.  At this point these can be frozen and baked later or, if using immediately, bake for an additional 5 mins. at 375o.  Enjoy!

Bacon Wrapped Water Chestnuts

These take a bit of time to put together but trust me, they’re more than worth that time!!  This year I had a little helper with me to hand me the chestnuts and toothpicks and that made the making of them that much more enjoyable!IMG_3982

Ingredients:

1 lb. bacon

2 small cans whole water chestnuts

1 cup brown sugar

1/4 cup ketchup

1 Tbsp. Worcestershire sauce

  • cut bacon strips in half
  • wrap each water chestnut in a slice of bacon, securing it with a toothpick
  • place in 8x8 pan

Bake for 30 mins at 350o

Remove from oven and drain

  • mix brown sugar, ketchup and Worcestershire sauce together
  • pour over water chestnuts

Bake for an additional 20 minsIMG_3981

Delicious!  Enjoy!!

Candy Cane Popcorn with Chocolate

This was a new recipe that I found on Pinterest this year and will be added to our annual repertoire for sure!

16 cups popped popcorn

2 cups white chocolate

1 cup crushed candy canes or mints (divided)

1/2 cup chocolate chips

1 Tbsp. butter

  • pop popcorn and place it in a large bowl (remove unpopped kernels)
  • melt white chocolate in the microwave: melt on high for 1 min, stir, then at 30 second intervals until melted
  • stir 1/2 cup of crushed candy canes into chocolate
  • pour over popcorn and mix together while sprinkling in remaining crushed candy canes
  • pour onto cookie tray
  • melt chocolate chips and butter following above method.  Using spoon drizzle over popcorn
  • cool
  • Enjoy!!IMG_3582

I hope you enjoy these ‘go to’ favourites as much as our family does!

Wednesday, July 20, 2011

Cottage Time = Annual Making of Monkey Munch!

Each year as we prepare to go to the cottage I whip up a batch of Monkey Munch.  It’s a fun, yummy treat that is perfect for sharing with a crowd. (Recipe at bottom of post.)

Last year Hannah was a little too young to help out but we made more last October and her first Monkey Munch experience was a success!

Last Wed night she and I had fun as we whipped up a batch to take to the cottage with us on Thursday.  Too bad we forgot it in the fridge….oops!  (Ended up being just fine though as Mom had had the same idea and made some while at the cottage so there was plenty to go around.)

So, without further adieu I give you, ‘The Making of Monkey Munch!’

(Warning:  There is much tasting involved in the making of MM!  Smile)

While the warm ingredients are melting in the microwave – test the peanut butterIMG_1053

Mommy says this spoon is for stirring but I’d much rather taste the ooey, gooey chocolate topping!IMG_1054

After stirring, quality check to ensure all pieces are equally coated…by tasting them!IMG_1055

Who needs a wash cloth to clean chocolaty fingers?IMG_1056

Shaking the bag with the cereal stuff and icing sugar.  Note to self:  next time don’t use no-name bags!  This oversight caused the initial shaking to create a small blizzard in July!IMG_1058

Spread evenly on a cookie sheet for cooling.IMG_1061

Taste the final product.IMG_1063

Heh….looking back at these pics, I guess it’s a good thing this batch will be in the freezer for the two of us to enjoy.  There sure was a lot of 2yo quality testing going on!!

Monkey Munch (aka Puppy Chow)

9 cups Rice Chex or Life cereal

1 cup chocolate chips

1/2 cup peanut butter

1/4 cup butter

1 tsp. vanilla

1 1/2 cups icing sugar

  • Pour cereal into a large bowl and set aside
  • Put chocolate chips, peanut butter, butter and vanilla in a microwave safe bowl.  Microwave for 1 min.  Stir.  Continue at 30 sec intervals until all ingredients are melted
  • Pour over cereal and mix well
  • Transfer covered cereal into a large zip-lock bag
  • Add icing sugar.  Seal and shake
  • Spread on a cookie sheet and cool
  • Enjoy!!!

What? You think I ate some? Whatever gave you that idea???IMG_1057

Friday, April 22, 2011

What Took Me So Long?

I’ve heard people talking about smoothies for a long time but I didn’t really know what all the excitement was about.  I’m a fan of frozen drinks but didn’t really know how to make them myself so just kinda let the fad pass me by. 

All that changed last week when a friend shared an easy smoothie recipe with me and I’m happy to say I’m now a smoothie convert – as is Hannah!

Melanie’s recipe consists of cranberry juice, plain yogurt and frozen berries.  I mixed it up a bit by using low cal cranberry juice and vanilla yogurt.  Delicious!!IMG_0139

Hannah’s version is similar but slightly different as I don’t give her any artificial sweetners so make it with regular juice and her yogurt.

Hannah loves this new little treat that we’ve found, especially since she gets to use a big girl glass!IMG_0142

Monday, March 14, 2011

My Adorable Little Chef!

I was recently contacted by CSN Stores offering me the opportunity to review an item carried by their stores and in turn offer a gift code giveaway to one of my readers.  The gift code is $20 that can be used towards a purchase from CSN Stores.

Hannah is beginning to help me more and more in the kitchen so I chose this adorable little apron and chef’s hat. It’s hot pink and oh so adorable on my little helper!  Initially Hannah wasn’t too keen on wearing the hat DSC_7269but once Mommy wore it for a bit she wanted her turn. 

We baked Ham and Swiss Cheese Scones (recipe below) as they are one of our favourite breakfast treats.  The apron is durable and adorable, easily adjustable as is the hat which closes with a Velcro tab.

Adding the ham and cheese is best done while sticking out your tongue.DSC_7279

Mommy’s Great Helper!

Hannah did really well mixing the ingredients.  I know there will be many more baking adventures in our future.DSC_7284

Even the cutest little chef needs to take a break every once in a while.DSC_7289

DSC_7288

Mmmm…the finished product.DSC_7299

Enjoying the yumminess.

DSC_7297

Once our baking adventure was over Hannah still wanted to wear the apron and it didn’t come off until it was time to put her pj’s on.  She had fun putting toys into the pockets of the apron and carrying them around.

Ham and Swiss Cheese Scones

2 cups all-purpose flour

2 tsp. baking powder

1/2 tsp. baking soda

1/2 cup butter chilled and cut into small pieces

1/2 cup shredded Swiss cheese

1/2 cup minced ham

About 2/3 cup buttermilk (probably a little bit more)


Preheat oven to 450oF.  Grease baking sheet.

Combine flour, baking powder and baking soda in a medium bowl.  Cut in butter with pastry blender until mixture resembles coarse crumbs.  Stir in cheese, ham and enough buttermilk to make soft dough.

Turn out dough onto lightly floured surface;  knead lightly.*  Roll out dough to 1/2-inch thickness.  Cut out biscuits with 2” round cutter.  Place on prepared baking sheet.

Bake about 10 minutes or until browned.

Makes about 18 biscuits.

*To knead dough, fold dough in half toward you and press dough away from you with heels of hands.  Give dough a quarter turn and continue folding, pushing and turning.

DSC_7282

This little set was a huge hit and I’m sure you’ll see it in many more posts to come.  If you’d like the opportunity to win a $20.00 gift code to be used towards a purchase at CSN Stores, please leave a comment below.  (This will be a quick turnaround giveaway as the gift code has an expiry date of March 31, 2011.  Entries will be accepted until 11:59PM EST on Thurs, March 17, 2011.  The winner will be chosen by a random draw from all comments entered.  One entry per person please. Also, please ensure that I am able to contact you via email. If an email address is not linked or provided I will redraw.  Thanks for your help!) 

Sunday, October 05, 2008

Making Apple Crisp

The final part of our annual Apple Picking adventure is making apple crisp. It's been fun over the years to watch the girls take over more and more of the preparation and now I'm sure they could make it from start to finish and only need Auntie Cathy to handle the oven portion.

Here are a few pics of the baking fun and I'll share the recipe at the bottom. One of the best investments in kitchen tools I've made was this great apple peeler that sticks to the counter with a 'suction cup thingy'. It peels, cores and slices apples lickity split! Doesn't get much easier and with the girls manning the peeler we were able to whip up 4 apple crisps in less than 45 mins!

Rebecca taking the peeler for a spin.


Victoria's turn:


Mmmm....nothing says fall like apple crisp hot out of the oven!

Special delivery! After we baked the apple crisps it was time to take the girls home. On the way we stopped at Victoria's Great Grandparents to deliver a special treat to them. Her GGparents have been 'Grandma and Grandpa' to me since I was a teen and I love them to pieces! It was so much fun to share our baking fun with them.

Apple Crisp


4 large apples, peeled and sliced
cinnamon
1 cup brown sugar
3/4 cup flour
1 cup rolled oats
1/2 cup butter

Preheat over to 350o

Lightly grease 9" pan

Fill the pan with the apples and spinkle generously with cinnamon

Mix oats, sugar and flour together

Melt butter and then mix with dry ingredients

Sprinkle topping over apples

Bake for 35 mins.

Enjoy!!

Monday, July 07, 2008

Making Monkey Munch

After seeing the post about cute little Marie getting out of bed to bake with Mommy I decided to try it out with Rebecca on Saturday night. We had arrived at the cottage in the afternoon so she was excited to be there and sleep was not going to arrive soon so when I got home at 10:30 I got her out of bed and we stared to bake! I love building memories and what's more fun than being able to get out of bed to do something fun?

I found the recipe for Monkey Munch which has been featured on a couple of episodes of Jon & Kate Plus Eight. I'd tried it out last week and immediately knew that it would be a perfect snack for the cottage.

We pre- measured the ingredients and took them to the cottage. We decided to make 1/2 the recipe but I guess that wasn't enough as mom called tonight for the recipe as Saturday's batch was already gone!

Ingredients for a full batch:
9 cups Chex cereal (I used Life since we don't have Chex in Canada)
1 cup chocolate chips
1/2 cup peanut butter
1/4 cup butter
1 tsp vanilla
1 1/2 cups icing sugar

Place cereal in a bowl and set aside.

Melt chocolate chips, peanut butter and butter for 1 min. in the microwave. Stir. Continue in 30 sec. increments until fully melted. Stir in vanilla.

Pour onto cereal and stir well.

When cereal is all covered, pour into a large ziploc bag.

Pour icing sugar over cereal mixture, seal and toss until well covered.

Pour mixture onto a cookie sheet covered with wax paper and spread out.

Cool in fridge. Once cooled it can be put back into the ziploc bag for storage in the fridge.

This picture doesn't do it justice but it sure is yummy. Enjoy!

All good cooks clean up their messes! I was sure the chocolate would keep her up but I think the excitement of the day finally caught up with her and she was soon out for the count.
If you're looking for a yummy, fun easy recipe to make with the kids I highly recommend Monkey Munch...and, making it in your pj's!

Monday, November 27, 2006

Mmmm...Christmas Baking!

Tonight my friend Joy-Lynn is hosting a Christmas cookie exchange so part of yesterday was spent preparing these yummy little treats. They're not officially 'cookies' but am sure they'll pass the test!

Friday I was trying to figure out what kind of cookies to bake. Scanning the web, analyzing how much time I'd have over the weekend to bake, etc. What a wonderful surprise it was to arrive home and find out that there was a package waiting for me at the post office. I hopped back into my car, looking forward to finding what little treat awaited Miss Hannah. What a fun surprise when the package was for me from my cousin Julie in Michigan! What a sweetie you are! Julie has made these tasty morsels the past couple of times we've gotten together at my aunt's place on Boxing Day (December 26th - A holiday in Canada except the stores are open and big sales! Kinda our version of Black Friday.) In the box was all the fixings I'd need to make these tasty treats! Round pretzels are impossible to find in Ontario. If anyone sees them, please let me know as these are a real crowd pleaser and very easy to make.

Anyway, as the weekend progressed I thought what fun it would be to take these little treats to the exchange so bright and early yesterday morning I was up making 16 dozen treats.

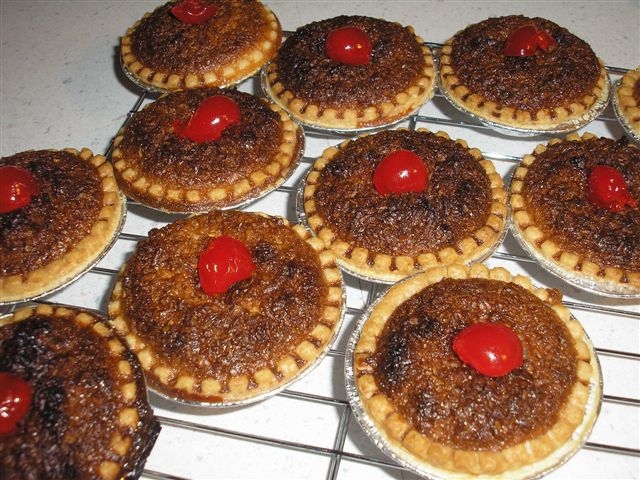
In the meantime I'd also emailed my friend Norma on Friday asking for her recipe for coconut tarts. She sent it so figured I couldn't let all her hard work go to waste so I made these too. Yummm! Note to self: Next year don't put tarts in oven and then climb up on the roof to hang Christmas wreaths. :o) Oh well, they're delicious all the same even if their tops are a little crusty!

Thanks again Julie for the wonderful gift! I'm looking forward to seeing you on boxing day!! Love ya!

Sunday, November 27, 2005

A Weekend of Scrapbooking and Christmas Appetizers

This weekend was a fun time of Christmas preparations. Friday night was grocery shopping and yes, it’s something I enjoy. I have a friend who rates this low on her scale of fun household jobs so sometimes I’ll go along with her as company. Hmmm...I’m not a fan of cleaning bathrooms. Maybe I should ask her to come help me out later this week when this 'fun' chore rolls (pardon the pun) around for me?

Saturday my friend Lisa and I spent a wonderful day scrapbooking together. It was a perfect time from beginning to end! Our monthly scrapbooking get-togethers began in September of this year and oh have we enjoyed them! Her husband loves to cook so prepares the meals for us and you have to know it’s not just milk and cereal! He treats us like royalty and we enjoy every morsel he prepares! Saturday’s breakfast consisted of Swedish pancakes with the choice of: warm apples, warm cherries, homemade vanilla sauce, chocolate sauce and crunchy pecan syrup. Yummmm! Add pemeal bacon (a.k.a. Canadian bacon for my US friends), orange juice and coffee and oh yah...that’s a breakfast fit for a queen!

After breakfast Lisa and I began scrapping. Trying to finish up the last of my Christmas cards. Lisa's 5 year old daughter has also caught the scrappin’ bug so we were happy to have C join us. Here she's displaying a beautiful Christmas card she made for me! What a fun time. Talking, laughing, scrapping, watching the snow gently fall outside...like I said...perfect!

Sunday was a day of making, ‘Ranch Stars.’ A friend gave me the recipe a few years ago and they quickly became something I was asked to bring to Christmas gatherings. Since I was awake early, I baked all the wonton shells (15 dozen) before going to church. Also, prepared the filling (ground pork, ground turkey, green and red pepper, black olives, TexMex cheese and Ranch dressing.) After returning from church and lunch with my family, the afternoon was spent filling and baking these delicious little morsels and freezing them in a number of containers for use over the next month or so. They take a little time but are worth it!

One thing I've noticed. Between the SW's visits to my home and my upcoming Disney trip with Rebecca I'm getting organized for Christmas a little earlier this year. Somehow I'm thinking it won't be this way next year if I have the baby by then. I'm guessing frozen appetizers and store bought cards will be in order...if I can find the time to buy them!
Related Posts Plugin for WordPress, Blogger...